Wednesday, June 29, 2022

Network Defend, LLC is closing


Transition News

Network Defend, LLC will be closing our doors on July 7, 2022 as we transition to a new adventure.  Existing clients are being guided through this transition to a new service company as their needs dictate.

As time permits, I may update this blog with new technical articles of general interest.

Monday, June 27, 2022

Unable to enable Security Defaults on free Microsoft Azure accounts? (FIX)

 If you manage an older Office 365 tenant, and noticed that your old MFA settings and other security features stopped working, you might have read that there are a new set of security baseline settings available.

However . . .  when you attempt to enable those settings, the Azure admin portal fails to accept them with various errors.  Other features that may break include turning on new polices for safe links, safe attachments, or anything to do with legacy authentication or MFA enforcement.

A quick test: try to follow the steps in this Microsoft document:

https://docs.microsoft.com/en-us/azure/active-directory/fundamentals/concept-fundamentals-security-defaults

When you click the link on your portal under Properties >> Manage security Defaults and try to turn on "Enable Security Defaults" you may see this failure error message:


Worse, if you are using the "Free" version of Azure without a P1 license or higher, you can no longer navigate via the menu to the classic policies to audit them.  So (as of this writing) here is a direct link to the page you need:

https://portal.azure.com/?microsoft_aad_iam_classicPolicyDontHide=true&microsoft_aad_iam_enableClassicPoliciesMenu=true#view/Microsoft_AAD_IAM/ConditionalAccessBlade/~/ClassicPolicies

There, you will see a page much like this, with four or more policies enabled.  Click the triple dot option link beside each and disable.


Back at your policy page, do a forced refresh and try to enable the Security Defaults again, it should work now!


Saturday, November 11, 2017

DDEAUTO exploit mitigation for Microsoft Office 2007 through Office 2016

There is a very old exploit that has recently come under fire by malware teams across the globe.  An attached document in email - when opened by the recipient - can now download and install malware without macros.  It does require some user interaction, but the errors generated during the infection phase are not the same as the warnings we've previously been teaching end users to ignore or decline.

At the very least, new training is required.

In a classic "it's a feature, not a bug" reminder - it does not look likely that Microsoft is going to patch this problem. If this changes I will update this post to point to future security patches.

For a primer on what DDE is, check out Microsoft's documentation:
Microsoft MSDN - About Dynamic Data Exchange


For more explanation of what the problem is, what end users need to learn (to say no to), how it's being exploited, and other considerations on whether or not to disable DDE, see the following sources:


 ghacks.net: Disable Office DDEAUTO to mitigate attacks

 Askwoody.com: Microsoft releases a Security Advisory about the DDEAUTO fandango

 Sensepost: Macro-less Code Exec in MSWord


Decisions:
Protecting your system thus comes to deciding to make a trade-off:  do you want to be more secure or do you want to preserve certain power features in Microsoft Office for yourself or your users? Below I will provide several options to mitigate DDE attacks at different levels.  You can use some or all of them depending on your risk tolerance.

If you and/or your organization relies heavily on DDE then you may need to turn to other mitigation factors: primarily a good AV, good spam filters, and GREAT end-user training.


Mitigation:
If you can do without DDE, then below are the full REG keys needed to partially or fully disable the feature.


Standard disclaimers apply here:  You use these at your own risk.
It's likely that any of these changes could BREAK your work process.  It's also likely that many third party applications that use DDE will BREAK, CRASH or corrupt data with these settings.  
You must test these on non-production clients before trusting.  
You must review and understand every REG change before accepting it for your system.  
These changes may or may not actually block anything from infecting your system.  
Past and Future patches from Microsoft may or may not render these settings ineffective!  
You should BACKUP your HKEY_CURRENT_USER registry hive before importing or editing the below changes.

(Credit to the following sources - the below REG keys are a compilation from both.
  Will Dormann on GitHubGist - disable DDEAuto and
  Microsoft Security Advisory 4053440 )

How to use:
After making these changes the end user must log out then back on for the settings to take full effect.  Also note that these changes are PER USER - not for all users on a machine.  You will need to import these registry keys into every user profile (either directly from an active session on each, or via Group Policy, or via user REG hive identification and editing the below for each one.)

Copy and paste the code text blocks into a TXT file such as Notepad.  Change the extension from TXT to REG.  Import under each user account. More advanced users can either edit the registry directly, or use Group Policy for domains or local machines using the settings listed as a guide.  Advanced users should also reduce the scope of each settings file to match the versions of Office installed on their systems.


The Registry Keys:

These first two are recommended at a minimum: (the current exploits target Outlook and Word.)

Disable DDE for Outlook 2007 through 2016


Windows Registry Editor Version 5.00

[HKEY_CURRENT_USER\Software\Microsoft\Office\16.0\Word\Options\WordMail]
 "DontUpdateLinks"=dword:00000001

[HKEY_CURRENT_USER\Software\Microsoft\Office\15.0\Word\Options\WordMail]
 "DontUpdateLinks"=dword:00000001

[HKEY_CURRENT_USER\Software\Microsoft\Office\14.0\Word\Options\WordMail]
 "DontUpdateLinks"=dword:00000001

[HKEY_CURRENT_USER\Software\Policies\Microsoft\Office\12.0\Outlook\Options\vpref]
 "fNoCalclinksOnopen_90_1"=dword:00000001


Disable DDE for Word 2007 through 2016

Windows Registry Editor Version 5.00

[HKEY_CURRENT_USER\Software\Microsoft\Office\16.0\Word\Options]
 "DontUpdateLinks"=dword:00000001

[HKEY_CURRENT_USER\Software\Microsoft\Office\15.0\Word\Options]
 "DontUpdateLinks"=dword:00000001

[HKEY_CURRENT_USER\Software\Microsoft\Office\14.0\Word\Options]
 "DontUpdateLinks"=dword:00000001

[HKEY_CURRENT_USER\Software\Policies\Microsoft\Office\12.0\Word\Options\vpref]
 "fNoCalclinksOnopen_90_1"=dword:00000001


Disable DDE for OneNote 2013 through 2016
Maybe optional, be aware that OneNote functionality is drastically reduced with these settings.

Windows Registry Editor Version 5.00

[HKEY_CURRENT_USER\Software\Microsoft\Office\16.0\OneNote\Options]
"DisableEmbeddedFiles"=dword:00000001

[HKEY_CURRENT_USER\Software\Microsoft\Office\15.0\OneNote\Options]
"DisableEmbeddedFiles"=dword:00000001


Disable DDE for Excel 2007 through 2016
Also might be optional, these settings for Excel drastically reduce functionality for advanced lookups, links, and data retrieval.  Expect user complaints.

Windows Registry Editor Version 5.00

[HKEY_CURRENT_USER\Software\Microsoft\Office\16.0\Excel\Options]
 "DontUpdateLinks"=dword:00000001
 "DDEAllowed"=dword:00000000
 "DDECleaned"=dword:00000001

[HKEY_CURRENT_USER\Software\Microsoft\Office\16.0\Excel\Security]
 "WorkbookLinkWarnings"=dword:00000002

[HKEY_CURRENT_USER\Software\Microsoft\Office\15.0\Excel\Options]
 "DontUpdateLinks"=dword:00000001
 "DDEAllowed"=dword:00000000
 "DDECleaned"=dword:00000001
 "Options"=dword:00000117

[HKEY_CURRENT_USER\Software\Microsoft\Office\15.0\Excel\Security]
 "WorkbookLinkWarnings"=dword:00000002

[HKEY_CURRENT_USER\Software\Microsoft\Office\14.0\Excel\Options]
 "DontUpdateLinks"=dword:00000001
 "DDEAllowed"=dword:00000000
 "DDECleaned"=dword:00000001
 "Options"=dword:00000117

[HKEY_CURRENT_USER\Software\Microsoft\Office\14.0\Excel\Security]
 "WorkbookLinkWarnings"=dword:00000002

[HKEY_CURRENT_USER\Software\Microsoft\Office\12.0\Excel\Security]
 "WorkbookLinkWarnings"=dword:00000002


Coming soon (to be appended to this article): Reverse all above settings back to defaults.


Monday, September 18, 2017

Blackmail Spam hitting email servers everywhere asking for bitcoin

Seen a bunch of this nonsense hitting my clients email servers for the last week:

Hi.

I do not want to judge you, but consequently of some cases, we have point of contact since now. I do not think that caress oneself is very bad, but when all your acquaintances see it- its definitely awful.

So, closer to the point. You visited the internet with роrn, which I’ve placed with the virus. After you chose video, virus started working and your device became working as rdp since that moment. Naturally, all cams and screen started recording at once and then my soft collected all contacts from your device.

I message you on this e-mail address, because I’ve collected it from your device, and I think you for sure control this work e-mail.

The most important thing that I created video, on one side it shows your screen record, on another your cams record. Its very funny. But it wasn’t so easy ,so I proud of it.

Eventually- if you want me to erase all this compromising evidence, here is my Bitcoin account address- xxxxxxxxxxxxxxxxxxxxxxxxxxxxxxxxxxxxxx (it must be without «spaces» or «=aquo;,check it). If you do not know how to make btc transactions, you can ask google or youtube for tips- its very easy. I suggest, that 320 usd will solve your problem and will destroy our touchpoint till kingdom come. You have thirty hours after reading this letter(I put tracking pixel in it, ill know when you read it). If you will not finish transaction, ill share the evidence with all contacts I’ve collected from you.

Finally, you can ask police for help, but, obviously, they will not find me for 1 day, so you will be shamed at all. Sorry for misprints, I am foreign.


We're fairly certain this is completely fake.  The only systems in question don't have webcams . . . Also tracking pixels - how 1990's scammy.  Laughable when Outlook is used correctly with all messages presented in safe mode.  Don't even get me started on the other mistakes, both technical and social, inherent in that letter.

You should totally ignore and delete this stuff without worrying about it.  However, if you do think they have a case, and you are even close to my age, then we suggest you freely copy and paste the reply below for your own amusement.

Dear Sir/Madam/Idiot,

I received your polite letter offering to destroy all video/audio evidence of a recent perceived indiscretion. It's my suspicion that you have not actually reviewed this material.  Go ahead, do that now . . .  I'll wait.

Ah! I see you are back, and that your eye bleach is somewhat under powered for the purpose.   Believe me when I state that I understand - even emphasize - with your pain.

Here's my counter offer.  I'll refrain from sending you even more video of me for the low low offer of USD $2,400.  Payable immediately by PayPal in "real" currency.  This offer will not last long, you have 24 hours to pay or your return email will be shortly inundated with more of me.

Thank you for your business!

 - me

There you go.  CC0 usage.  Feel free to share and use as you see fit.  No attribution needed.

Seriously though:  Even though this has been repeated too many times -- don't reply to these spams, or any spam.  You'll just get more spam for your troubles.

Cheers

Friday, October 28, 2016

[Fix] Outlook Error: 3219. Server. An error occurred in looking up the user's information in mserv.

You've been happily using Outlook 2010 (or 2007) with a Hotmail.com, Outlook.com, MSN.com or Live.com email address for . . . well . . . forever.  It's worked mostly fine for years.

Sometime in the last few days it stopped working.  You can see that your account is fine if you log in via a browser, and it works on your phone - but Outlook on your PC suddenly decided you no longer exist.

If you click the error notification in the bottom status bar in Outlook, you see one or more of the following errors:

There is an error synchronizing your mail account. Please verify your account is configured correctly by first accessing your mail on the web.  Error: 3219. Server. An error occurred in looking up the user's information in mserv.

Error with Send/Receive.
There was an error synchronizing your folder hierarchy. Error : 80041004.

“Task ‘your email address’ reported error (0x8004102A)
‘Error with Send/Receive’ 


Several MS sources on these errors tell you to try a tricky schedule of recreating a folder you might or might not have lost, etc etc.  It fails to help.  Removing the account and adding it back in also fails.

What's probably happened is that your MSN/Hotmail/Live/Outlook email account was just migrated to the new email servers on Microsoft's side.  You may or may not have received a notification recently that this was about to happen.  I certainly did not receive any such notice.  If this is the case, you can fix it easily.

1) In Outlook, remove the account (Tab "File", select Accounts, highlight the offending account and remove it)

2) Close Outlook

3) In Control Panel, Programs and Features, find and remove the Outlook Hotmail Connector (Also called the Microsoft Office Outlook Connector)


4) Reboot your PC

5) Open Outlook and add your account - after it succeeds, it will likely tell you to close Outlook and re-open.  Do what it says.

Ta da!

Why?  Because when your account was migrated recently, the new email servers no longer need or want the old MAPI based Outlook Hotmail Connector.  They're using a slim version of Exchange for Office 365 now.  Which Outlook 2007 and 2010 support natively without the special add-on connector.  But the add-on connector won't let go when you try to create the account, so away it goes.


Sunday, September 4, 2016

Fix: Windows 10 Error 0x8007003B When Creating or Renaming Folders on a Network Share (Very Slow Folder Creation)

Problem:  Users on client machines running Windows 10 Pro Version 1607 Build 14393.x (the August 2016 Anniversary Edition) on a network with Windows Server 2012 R2 providing file shares ran into a frequent problem when copying, creating or renaming folders on any share residing on the server. Folder creation or folder renaming would take several minutes, would hang File Explorer, would often produce a popup error stating "Error 0x8007003B: An unexpected network error occurred" and - while this error was ongoing (several minutes) that file share would be unavailable to other processes running on the same client machine (which often led to other programs such as AutoCAD crashing.)

This error began shortly after one of our client machines was updated to Version 1607.  The previous version of Windows 10 did not exhibit the problem.  We were able to reliably reproduce the problem on other client workstations by simply upgrading them to the Anniversary Edition of Windows 10.

UPDATE 5 - March 15, 2017 - Fixed and being delivered this week via Automatic Updates.  You should verify that your workstations have installed the "Cumulative Update for Windows 10 Version 1607 for x64-based Systems (KB4013429)" released by Microsoft on Tuesday, March 14 2017.


UPDATE 4 - January 26, 2017 - TL:DR Might be fixed with a new official patch! (Testing today looks very good.)

Not yet available via automatic updates, a new preview update has been posted to the Microsoft Update Catalog. Look for KB3216755 for Windows 10 Version 1607.

This update appears to completely fix the problem on both my test system and on one of my clients networks.  The patch is for the Windows 10 Anniversary Edition workstations, no patch needed on the file server.  After applying the patch, and rebooting the workstations, you should turn search back on at the file server by setting the Windows Search service to Automatic in the Services MMC.

In my case, because Windows Search (on the 2012 R2 server) had been off for so long, indexing seemed to be taking too long - so I dumped the old index and forced the server to rebuild the search index from scratch. 


UPDATE 3 -Deprecated - advice no longer relevant at all.


UPDATE 2 - January 9, 2017 - NOT fixed yet. But a patch may be coming "soon."
Per a new post from MSFT employee Chris on the main MS thread posted January 6, 2017:

The backport of the fix for this is still in process.  It has not released in an update yet and will not be in the update releasing next week.
The Windows Insiders Release Preview ring gets a preview of the patches a couple of weeks before the release goes out to the public.
I will post back when it goes out to the Release Preview ring for Insiders as this will give you some notice before it goes public and a chance to try it out if you have a machine enrolled in it.  Hang in there.

UPDATE 1 - November 30, 2016 - TL:DR: It's NOT fixed yet.

  • Microsoft announced yesterday that Windows 10 build 1607 version 14393.447 is being set as the Current Branch for Business (CBB) release.  I got a little excited on reading this news because I thought to myself "surely they'll have fixed this issue before pushing this out on WSUS for businesses that set their upgrade policies to the CBB."  Alas . . .  our companies testing on this build (with Server 2012 R2 fully patched to the very latest updates as of today, and Windows Search service on that server enabled and fully indexed) shows that the problem still exists.  And it's still somewhat random - as in the error and extreme lag when creating a folder on a share does not occur every time, but it occurs often enough to be be a show stopper.  I expect to see more dismay on the TechNet forum post linked below. That thread is already getting close to a new record in length for Microsoft's support site.

We now return you to the original post with the painful workaround below.


Finding the Issue:
After running through a massive troubleshooting session, in which we checked for buggy shell handlers, anti-virus conflicts, firewall conflicts, making sure the server and client were completely up to date and even swapping out a network switch, we finally found a single reference to this problem on the Microsoft Technet forums where someone had stumbled on the same problem.  Unlikely as we felt their solution was, it did solve the problem - at a cost.

For those interested, here is the post:
Problem creating/renaming a folder on a network share with Win10 Anniversary Update (Error 0x8007003B)

If you read that thread, the solution is to disable the Windows Search Service on the file server.

This is where things get painful for some of my clients - we use that service to allow fast searching on large file repositories.  In some cases there are dependencies on the server side search service where turning it off (or uninstalling it) may break other services such as Exchange Search or SharePoint Workspace.  So before you decide to follow the directions below - think and research your specific deployment needs carefully. In our case, we had to divorce certain functions onto separate VM's or physical servers before "fixing" file shares.


Solutions:

Note: Rebuilding the Index on the server did not help.  The only solution for now is to not run Windows Search on a file server.


Option 1: Simply disable Windows Search (but leave it installed in case this gets fixed soon and you want to turn it back on.) Then wait for Microsoft to fix this on Server 2012 R2 (and probably older servers running Windows Search 4.0).  This is also the best way to make sure you're not going to break other stuff as it's very easy to restore in short order.


Note: no reboot is required for this method.  Also be advised that if you perform steps 3 and 4 out of order, Windows will continuously restart the Windows Search service until you disable it.  I find it more graceful to disable first, then stop the service.
  1. Open "Services"
  2. Scroll down and find Windows Search > right click to select Properties.
  3. Change "Startup type" to Disabled and click Apply
  4. Stop the Windows Search service
  5. That's it!


Option 2: Remove the Windows Search feature entirely on the file server.  This may require you to reposition your file servers to separate VM's or machines from your other servers.  Could be complicated - test and research first!

Note: this method requires a reboot of the file server.
  1. Open "Server Manager"
  2. From the Dashboard, click "Add roles and Features"
  3. On the first page of the wizard, click the link "Start the Remove Roles and Features Wizard"
  4. Select your server > Next
  5. Skip the Server Roles (no changes) and click > Next
  6. On the Remove Features page, scroll down and Un-check "Windows Search Service" then click > Next.
  7. On completion, you need to restart your file server.

When or if Microsoft fixes this problem I will try to update this post.


UPDATE: I am hearing that this is a problem for pretty much all combinations of Windows 10 v1607 when using any windows server or client as a file sharing target on a LAN . . .    It's likely the above first option will work in those cases to solve the problem.


Wednesday, May 25, 2016

Fix Windows 7 Updates stalling out or hanging on a new install

Checking for Updates in Windows 7 taking forever?


Revision History:
May 25, 2016 = Initial list posted.
June 15, 2016 = Updated with kb3161664 which supersedes kb3153199
June 22, 2016 = Microsoft has released kb3161647 as a fix for this specific problem (long waits for Checking for Updates.)  See extended NOTE1 below for comments and prerequisites for this patch, and how to obtain it.

October 19, 2016 = there is a more streamlined set of instructions that are being maintained by Dalai at Search for Windows Updates takes forever? - A possible solution that I just tested.  It's every bit as effective, covers this problem for both Windows 7 and Windows 8.1, but has fewer steps and downloads required.  He also supplies a nice script that can automate the procedure.  I still recommend on Windows 7 machines that you apply KB3020369 and KB3125574 first, as this will greatly reduce the number of updates that are needed to bring a newly installed machine completely up to date in the least amount of time. Unless he stops maintaining his list, or something dramatic comes up, I don't intend to update this post again in the future.

Original post continues below for continuities sake.

Several times in the last year when our company went to re-install Windows 7 on a workstation, we noticed that Microsoft Updates would take several hours (if ever - sometimes it would fail after a full day) to check for needed updates.  This held true for workstations that pulled updates directly from Microsoft and for domain joined workstations that used a local server running WSUS.  Each time we monitored where the process was hanging and identified an update that was failing to be compared to the workstations file versions.  This problem became a bit more public with a recent article on Paul Thurrott's blog: The Convenience Rollup Makes a Big Difference, But Windows 7 Updating is Still Broken.  I commented there with the current list of specific updates that have helped us resolve the problem.  Because the list might change over time, I decided to post that list here, with the intention of updating the list in the future if needed.

Prepare a new install of Windows 7 to quickly obtain Microsoft Updates:

Here are the current steps we use as of this month (June 2016).  You can find all the below updates in the Microsoft Update Catalog.

1) Push your machine image onto the hardware (or clean install Windows 7 from your source disk).
2) Copy ALL the below updates to the local hard drive on that machine.
3) Turn OFF Windows Update in settings.
4) Disconnect the Network on the machine (yes really, and it makes a huge difference). *
5) Reboot once after disconnecting from your network. (disable Wi-Fi or literally pull the Ethernet connection.)
6) Install from your local copies in this order and reboot between each one:

- Windows 7 Service Pack 1 (if not already on the image or install media)
- kb3020369 (Re-Requisite for the new roll up - the April 2015 servicing stack update)
- kb3125574 (the new Convenience Roll Up - installs most core updates - but not all - on a new machine up through April 2016)
- kb3138612 (March 2016 Windows Update Client)
- kb3145739 (Security update for Windows Graphics Component: April 12, 2016)
- kb3153199 (Security update for Windows Kernel-Mode Drivers: May 10, 2016)
- kb3161664 (Security update for Windows 7 MS16-073 supersedes above kb3153199: June 15, 2016)
- kb3161647 (Windows Update Client for windows 7 and Windows Server 2008 R2: June 2016 which supersedes the above kb3138612)

NOTE1:
The June 2016 Windows Update client can only be obtained via the June 2016 update rollup: kb3161608.  Including SP1 as a prerequisite, you also need the April 2015 Servicing stack update kb 3020369 before installing this new rollup. This was already on the list above as the very first update required to fix the slow check for updates.  This deprecates the above listed March 2016 Windows Update Client, so you can skip that now.  The list has been re-ordered to ensure that you install old to new for the system files being changed.


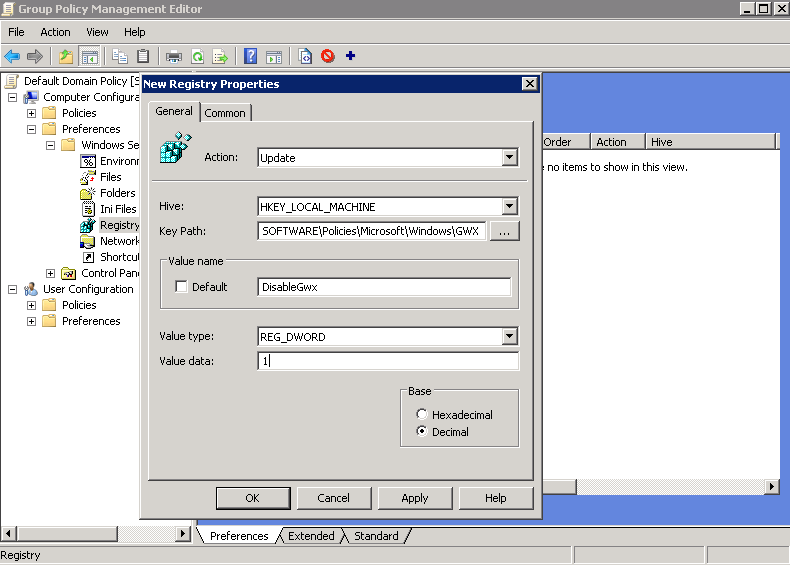
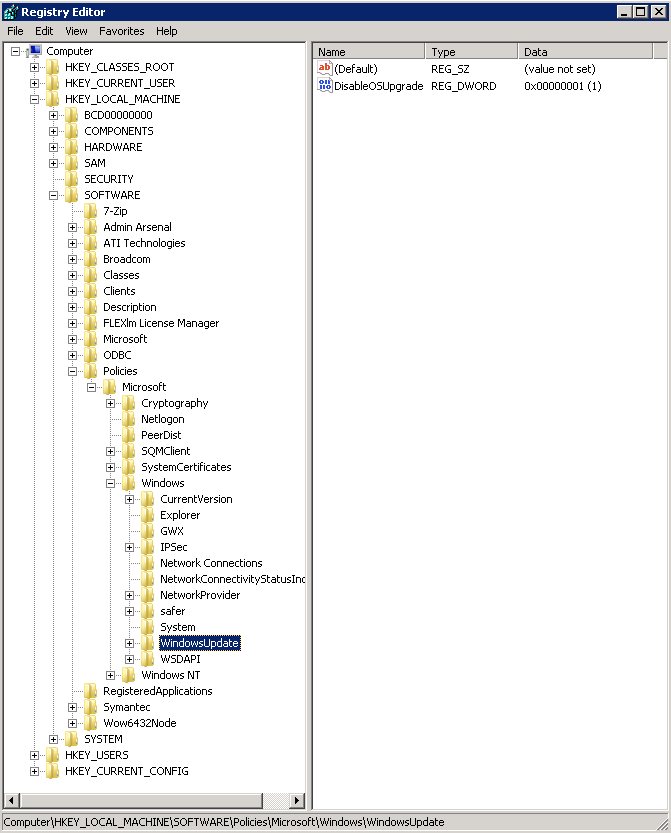
- Optional - run GRC's "Never10" to prevent the upgrade offer to Win10, or use the raw reg keys as provided by Microsoft - same difference. We push these keys out via Group Policy.

Once all the above are installed successfully:
1) reboot once again,
2) reconnect the network,
3) turn Windows Update back on,
4) change Windows Update settings to use Microsoft Update (so you can get updates for other Microsoft products like Office),
5) if you are on a domain, join the workstation to your domain now,
6) then check and install any remaining updates as you need from Microsoft.

The Checking for Updates process should now take minutes instead of hours.

After this we join the machine to our domain, linking it to WSUS - and generally there are no more problems with monthly updates. Twice now we have had the method above break, and had to research and add a very specific update to our list. This occurred with kb 3145739 and again the next month with kb 3153199 . . . no idea why lack of these specific updates would cause the check for updates process to take many hours.

We do this in-house to avoid hours if not days to update a new/reloaded workstation. But as a home or small office self serve customer it is absolutely ridiculous to expect anyone to have to find and do these steps to get a new computer running Windows 7 up to a point where it's safe to connect to the Internet.

If you are an advanced IT Administrator, you can slipstream all the listed updates into your source images and achieve the same benefit.

* Note: We found that the separate updates listed above also invoke an online check with Microsoft to see if they are the latest version or not, which hangs the machine if Windows Update is not already working.  Since this process is to fix that exact problem, the only graceful solution we have found to prevent it is to take the machine completely offline while installing the list. You can force a disconnect physically by disabling Wi-Fi with a hardware switch (if your system has such) or by pulling the network cable out of the socket, or by disabling the relevant network adapter in Network Settings. Be sure to remember which way you did this!


Wednesday, March 2, 2016

Upgrade to Windows 10 - some key points to smooth the way

As of March 1st, with the release of Windows 10 Cumulative Update KB3140743, I am finally comfortable in recommending Windows 10 Professional for my clients. It's been a long and sometimes painful process testing each major update to the still new Windows 10 system. As of this month I finally feel that Microsoft has an Operating System that can replace the aging Windows 7 that we all loved and hated.

A word about privacy and Windows 10:  Refer to Paul Thurrott's excellent how-to article: Windows 10 Tip: Understand and Configure Privacy Settings.  He explains in detail what options are available during the upgrade/install and after, and what the settings mean.

There are two methods to upgrade to Windows 10 from your existing install of Windows 7 or 8.1. For this article only high level guidelines are presented. Finer details will vary from system to system, but the below advice should serve to get most people through the process with minimal fuss.

1) An in place upgrade.

2) A clean install.

There are benefits to both, depending on your situation.  Let's talk about both scenarios a bit.


In place upgrade to Windows 10 from Windows 7 or 8.1:

You'll get to keep all your existing software installs, with one exception - more on that in a moment.  Most of your software will retain it's activation status, although some may need to be re-activated. All your settings will mostly stay intact for those applications.  Assuming a healthy base system - no malware infections, adequate disk space, hardware in great condition, decent hardware specifications - this is the easiest path to take.  There are however some things you can do to make the upgrade go smoothly.

a) Clean your disk drive.  Run the disk cleanup utility in Windows in both user mode and system (admin) mode.  Use it to clean out your temp folders, old system restoration points, old windows updates and old service packs, etc.

b) Uninstall all toolbars from all browsers.

c) Update any alternate browsers to the newest version.

d) Run Windows Update and pickup the latest service packs and updates for Microsoft software, especially Office and the OS itself.

e) And the most critical part:  Uninstall your Anti-Virus completely, especially if you have Microsoft Security Essentials.  Keep your registration information handy for any paid AV product you own, and I recommend downloading the latest version of that AV product to your hard drive before doing the OS upgrade . . . but don't install and activate it until after you have successfully upgraded to Windows 10.  If you were using Microsoft Security Essentials then you need to know that there is no version of that for Windows 10 - Microsoft is providing Windows Defender in it's place and it's already included in Win10.  You should also be aware that there is a nasty bug (still) where Windows 10 breaks after the upgrade if you left Microsoft Security Essentials installed before the OS upgrade.

f) To upgrade simply accept the prompt you've been ignoring for months.  If you blocked the free upgrade follow the reverse steps to unblock it for which ever method you used.


Fresh clean install of Windows 10:

This will be much harder for most people. You will have to re-install all your applications from their source after the OS install. You may have to chase down drivers for your system.  You will also have to backup and restore your data.  The benefit is you get to start with a clean system.  No hangovers from malware or corrupted systems, and no leftover garbage from the original system.

A) You'll need a blank USB thumbdrive with 4GB space or better on hand.

B) Download the free Microsoft Media Creation Tool here.

C) Run that tool - use it to "create installation media for another PC," and tell it to download the appropriate version to match what you have and create an installation USB drive.

D) It will make your USB thumbdrive bootable, and copy the Windows 10 install files to it.

E) Backup everything!  And be certain you know how to get your personal/professional data back out of that backup.  I recommend you make a second file to file backup to a USB drive (not the one you are using to install Windows 10) of all your photo's, video's, music, documents, financial software databases etc.

F) Determine at least these two hardware components on your system, and download Windows 10 compatible drivers for them in advance to that USB data backup drive:
  • Your network adapter, and 
  • your video card.
G) Boot the computer you want to upgrade to that USB media you created and follow the prompts to do a new installation . . .
  • Activating your free upgrade during a clean install: Use your product key from your old Windows 7 or 8.1 installation.  Assuming it's legal, and you have not used it already to upgrade to Windows 10 you should be good to go.
  • If you already upgraded to Windows 10 in the machine before, you can skip the product key.  Activation is tied to your hardware.

H) After the install if you don't have network access then use that driver you downloaded to install the correct files for Windows 10 to talk to the world.  Also if your monitor is showing an incorrect resolution - you can now install that video driver if needed.  Most of you won't need either.

I) Run Windows update and get fully patched, repeat, reboot, repeat until no updates are available.

J) Install your applications, and update them.

K) Restore your user data to the system.


Tuesday, February 2, 2016

Disable Windows 10 Upgrade for Workstations on an Active Directory Domain via Group Policy

Microsoft has started to push the free upgrade to Windows 10 on small business domains.  I thought this might be a good time to post a short reminder on how to prevent this.  If you are using WSUS and have not accepted updates KB2952664 and KB3035583 then you should be safe for now.

I tend to be a bit paranoid so went ahead and pushed the blocking registry keys out on those clients with WSUS anyway . . .

According to Microsoft you can block this upgrade entirely on all workstations on your network, as well as turn off the nagging upgrade popup/notification, with two registry key additions.

If you are running a Domain Controller / Active Directory you can push these simple registry keys to all computers under that server.  Alternately you can download and install an update on the AD Server and push the same settings out with a new template.  I chose to use the simple approach for now.

More information from Microsoft on these settings (and how to later reverse them) is on their knowledge base article: How to manage Windows 10 notification and upgrade options.

Note: the following method requires that workstations running Windows 7 have the March 2016 Windows Update Client - kb3138612 at a minimum.  Newer Update Clients also work.  Older ones will not "see" the registry keys below and may still be upgraded fully to Windows 10 by accidentally clicking the wrong thing.

The two keys we want look like this - and you can manually import these into any workstation running Windows 7 or 8.1 to prevent upgrades - no domain needed.

Important!  Note the Odd CaPitaliZation on the keys below - they must be entered exactly as shown.

Windows Registry Editor Version 5.00

[HKEY_LOCAL_MACHINE\SOFTWARE\Policies\Microsoft\Windows\GWX]
"DisableGwx"=dword:00000001

[HKEY_LOCAL_MACHINE\SOFTWARE\Policies\Microsoft\Windows\WindowsUpdate]
"DisableOSUpgrade"=dword:00000001


To push these out via Group Policy:

1) on the domain controller server open the Group Policy Management console.

2) for our purposes we will Edit the Default Domain Policy

3) navigate to Computer Configuration, Preferences, Windows Settings, Registry

4) right click Registry and select New, Registry Item

5) Create an Update rule for HKEY_LOCAL_MACHINE
with Keypath: SOFTWARE\Policies\Microsoft\Windows\GWX
and Value: DisableGwx
And Type: REG_DWORD
and Value Data: 1


DisableGWX Domain Policy

Click OK and lets do the second key!

6) Same place - right click Registry and select New, Registry Item

7) Create an Update rule for HKEY_LOCAL_MACHINE
with Keypath: SOFTWARE\Policies\Microsoft\Windows\WindowsUpdate
and Value: DisableOSUpgrade
And Type: REG_DWORD
and Value Data: 1


DisableOSUpgrade Group Policy   


Here's what you should see when you check your work (right click the below image and View to see it all)


Right Click and View to see the entire image : Domain Policy - checking for errors


And here is the test on a client machine after forcing a Group Policy update:


Remember to reboot all the clients - this policy is delivered during startup of the target machine, also reboot if you manually applied these registry keys.


Cheers!

Tuesday, December 8, 2015

KB3114409 - Patch Tuesday December 2015 causing Outlook 2010 to open in Safe Mode only

Outlook 2010 will open only in Safe Mode?

Another broken patch from Microsoft came at us this month.  KB3114409 may cause some users to be unable to open Outlook 2010 except in Safe Mode.  No custom settings are retained, your views and options will always revert to safe defaults every time you open Outlook.

For now removing KB3114409 from your workstation cures the problems.  I suspect MS will re-issue this patch in the next week - so you can either hide the update after removing it (if you have automatic updates this is recommended) or ignore it if your updates are set to manual.

WSUS operators should reject this patch on their corporate networks for now.